
This tutorial will guide you through the process of how you can download, create and edit cloud-init templates and import them into Proxmox VE.
But what are templates? You can imagine templates as a ready-to-go server, which you can deploy quickly without going through a whole setup process. For homelab users this means that you can quickly spin up a KVM-Server to test some software or a docker-container which won’t run natively in LXC. If you are a hosting-provider and/or offer digital services where you need to setup servers automatically, this would be one way to take on the task. All the images I will be presenting here support cloud-init, which enables you to set parameters on boot (like root-password, ssh-keys, network configuration, etc).
With this guide, I want to guide you throught the whole process of how to find, download, modify and upload a cloud-init based image to Proxmox VE and deploy a virtual server from that template. I will also attempt to share all relevant links and sources so you can download all the templates yourself.
Let’s start! I will be using Proxmox VE 6.4-6 which is the newest at the point of writing. This guide should work for all versions prior to this until at least the 6.0 release.
Images Repositories:
This is a list of all the relevant repositories where you can find cloud-images. You mainly want to download .qcow2 files, some vendor may have other file-endings which would need to be converted to qcow2.
CentOS (search for GenericCloud images)
CentOS 6: https://cloud.centos.org/centos/6/images/
CentOS 7: https://cloud.centos.org/centos/7/images/
CentOS 8: https://cloud.centos.org/centos/8/x86_64/images/
Even if Red Hat announced the discontinuation fo CentOS it still plays a big role in enterprise-application, so you might need it to test some special application.
Debian
Debian hosts own cloud-images here: https://cdimage.debian.org/cdimage/cloud/. Here you want to choose the newest build and the “generic” versions, since we are not bound to a cloud-provider like AWS or Azure.
Ubuntu
Ubuntu also hosts it’s own images on their CDN, which you can find here: https://cloud-images.ubuntu.com/. Here you can freely choose which image you want to use, just pick the one that is appropriate to your architecture.
RHEL
RHEL (Red Hat Enterprise Linux) also provides cloud-images for their customers, so you need to be logged in to download them. You can find the links here:
– RHEL 7: https://access.redhat.com/downloads/content/69/ver=/rhel—7/x86_64/product-downloads
– RHEL 6: https://access.redhat.com/downloads/content/69/ver=/rhel—6/x86_64/product-downloads
Arch Linux
Arch Linux offers pre-build qcow2 images here: https://mirror.pkgbuild.com/images/
Fedora
Fedora also hosts it’s images here: https://alt.fedoraproject.org/cloud/. You want to choose “Cloud Base image for Openstack”, because OpenStack also uses cloud-init for deploying virtual maschines.
Most Linux Distributions nowdays offer cloud-init-ready images which you can freely download, mostly on their download pages. There are also Windows Server images https://cloudbase.it/windows-cloud-images/ or creation-tools like this: https://github.com/cloudbase/windows-openstack-imaging-tools/ but I won’t go into detail on this one.
Now, let’s download one of those images and modify it. I want my image to have the following things:
- SSH-enabled Login via root with password-authentication on, because the image will not be used in a production environment. In a production environment you want to have root-login disabled and SSH-password-based authentication as well off, so people can only login with a key + a dedicated user.
- a custom MOTD which will be displayed when I login.
I will use the Debian 10 cloud-image, since that is what I am most familiar with. The setup should not vary much, since we are editing cloud-init images, but there might be one or two differentes between distributions.
We will need libguestfs-tools on the linux-maschine where we will modify the templates, so we can install that via apt (https://libguestfs.org/).
$ wget https://cdimage.debian.org/cdimage/cloud/buster/20210329-591/debian-10-genericcloud-amd64-20210329-591.qcow2Next, I’ll rename the file to “debian-image.qcow2”, because we will be typing this a few times during the setup and the long name is tidious.
Now we can open the image up and edit files. You will not be able to browse the directory structure like you are used to, instead you have to open each file specifically. I’ll go ahead and open the “/etc/cloud/cloud.cfg” file, where most of our editing will take place. Don’t worry, the command takes some time to unpack the image, just be patiente.
$ virt-edit debian-image.qcow2 /etc/cloud/cloud.cfg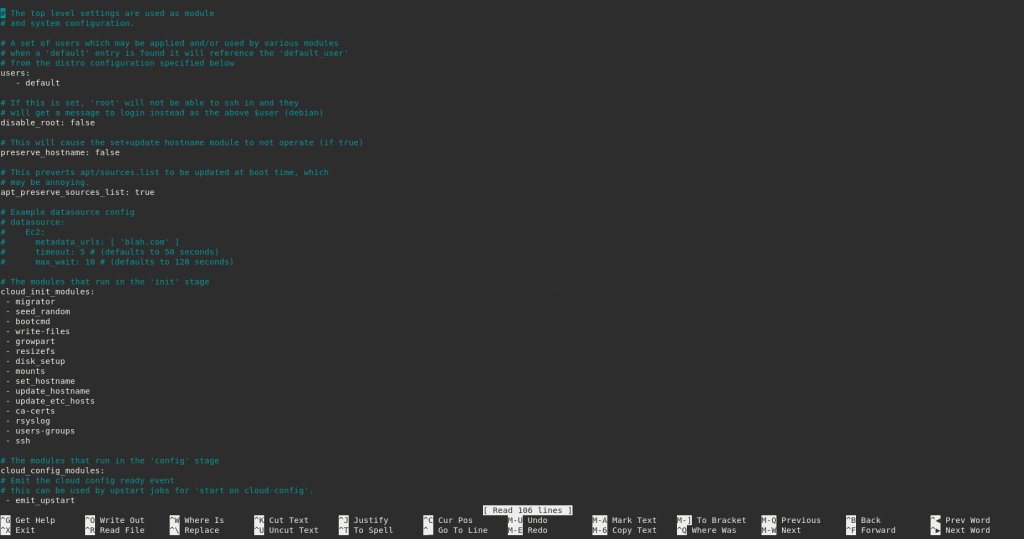
As you can see, there is a parameter called “disable_root”, which is set to “false” by default. This is because, as mentioned in the beginning, root is disabled by default, because of the security risks that comes with allowing root-login. In my case, I can safely set that to true.
I will also edit the “/etc/ssh/sshd_config” to enable root-login over SSH, which is of course also disabled by default.
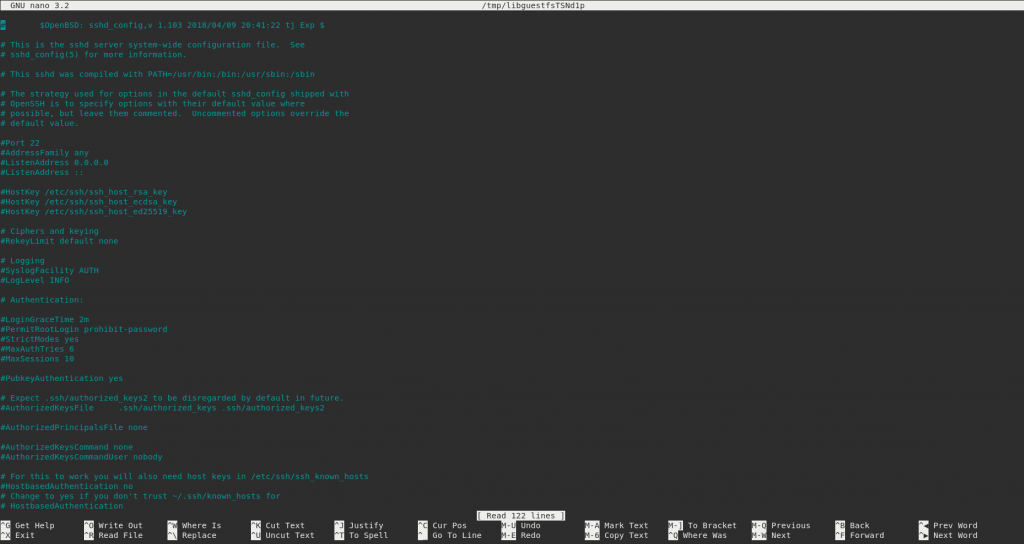
This is an easy one, we just have to comment in the “PermitRootLogin” by removing the “#” in the beginning and changing the value to “yes”, so the line is just “PermitRootLogin yes”. We also need to enable password-authentication by changing “PasswordAuthentication” from “no” to “yes”.
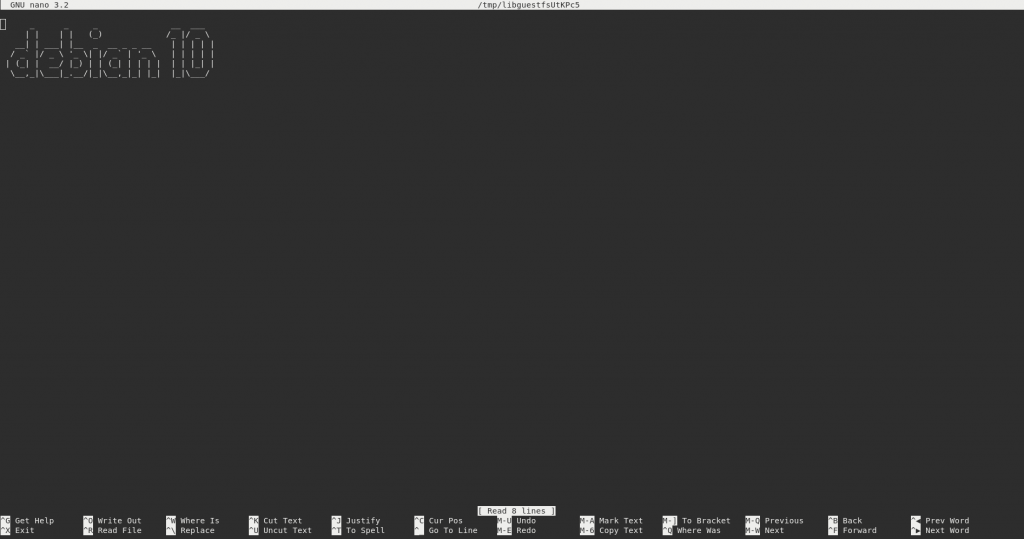
Next, to display my custom MOTD, I will edit the “/etc/motd” file, to just add some ASCII-art.
Now we are basically done and just need to import the image to Proxmox. Since I was doing the modifications on the Proxmox server, I can run the commands just in the current terminal, otherwise you’d have to transfer the file to the server, for example over scp or sftp.
Proxmox VE import & template creation
Now that we have the file where we need it, we can start by creating a virtual maschine where we will apply the image. I will use the VMID 9002, since that one is unused at the moment.
$ qm create 9002 --name "debian-10-cloudinit-template" --memory 2048 --net0 virtio,bridge=vmbr0the bridge argument should be exchanged to whatever your actual bridge device is. vmbr0 is the default, but double-check just to make sure.
Next, we can import our qcow2 image into the proxmox-storage so we can assign it to the VM.
$ qm importdisk 9002 debian-image.qcow2 local-lvm“debian-image.qcow2” is my filename and local-lvm is the storage in which I want to import it. You can of course use any other storage, as long as it can store “disks”. You should now see a process-log and something like “Successfully imported disk as ‘unused0:local-lvm:vm-9002-disk-0′”.
We can now assign the imported disk to our created VM:
$ qm set 9002 --scsihw virtio-scsi-pci --scsi0 local-lvm:vm-9002-disk-0Depending on your storage, there might be a slight variation in the –scsi0 parameter. You often can use the part after “unused0:” from the previous command.
Next, we need to assign the cloud-init drive. Proxmox has direct integration for cloud-init, so that command is straight forward:
$ qm set 9002 --ide2 local-lvm:cloudinitYou should see something like “Logical volume … created.”.
Now we just need to set the boot-disk and convert the VM into a template, so we can use it from the Proxmox GUI.
$ qm set 9002 --boot c --bootdisk scsi0
$ qm template 9002
And we are done! We can now go into the gui and create a server based on our image.
We want to go into Proxmox and right-click our new template in the sidebar and choose “Clone”. A dialog like this will pop up.
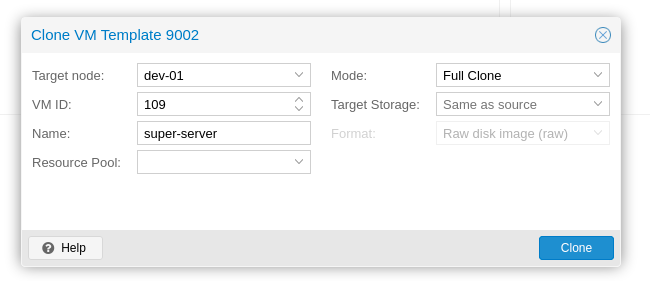
Here you will enter the Node on which you want to create the server (everything except the node where the storage is on will require the template to be located in a share-storage like NFS, iSCSI, Ceph, etc..), the Hostname (Name) and the VMID. I will not change the Target Storage, but you can do that of course. Also I’m choosing “Full clone”, because then the whole template gets cloned and I can remove the template whenever I want to. If you choose linked clone you cannot delete the template without also deleting the servers cloned from that template (but it saves drive-space).
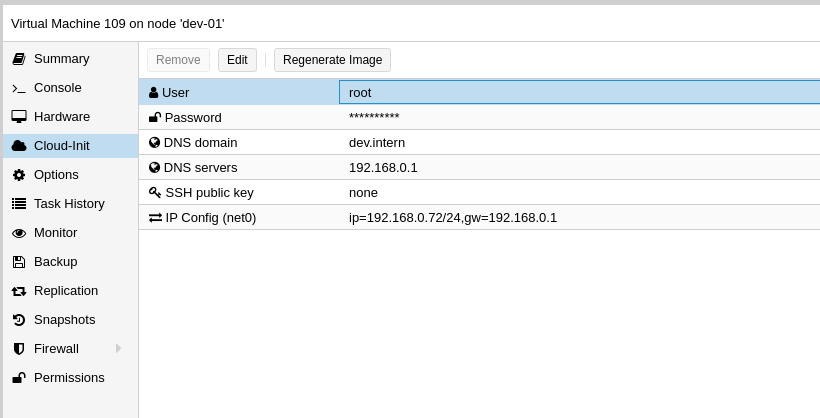
When we navigate to the new VM and go to “Cloud-Init”, we can change the default parameters of the cloud-init drive which will be applied once we start the VM. I’m changing the User to “root”, the Passwort to something secret and also set the DNS and IP-Parameters, so the VM has internet access.
Now we can just start the Server and go to the console and watch the cloud-init magic happen. After the setup is done, you should be able to connect over SSH, so in my case “ssh root@192.168.0.72”. I have to enter my password – as expected and we’re good to go!
I hope this guide leads you in the right direction to make your deployment of servers quicker and more efficient! If you are in search for a hosting panel to offer Proxmox-based server hosting to customers, check out my product at https://bennetgallein.de/shop/proxmox_control_panelhttps://bennetgallein.de/shop/proxmox_control_panel.
If you have any questions, don’t hesitate to reach out over E-Mail (me[at]bennetgallein.de) or leave a comment.


